MY ETSY SHOP

Saturday, August 18, 2012

A day with a change of plans...

Lanscaping with shells

I have wanted to do this forever!  and I love the way it looks!  

It's hard to live in Florida and not love the beach. But I have always loved the ocean.  I have always loved the water: the river, the bay, the sound, the gulf BUT there is nothing like the Ocean.  


Whenever I stand on the edge of "my" world and gaze out as far as I can see, I can feel so small on God's earth but so at peace.  On a nice day it is truly peaceful and calming, feeling the current tug.  Tug at your feet, tug at your soul, rejuvenating your mind, body and soul.  But on a day with a storm on the waters, the fury and anger that churns rising and falling is a magical message that "this too shall pass".  My life, just as the ocean, has ups and downs.  It has good days and not so good days.  It goes back and forth, and sometimes it's in a spin...but always, after the storm comes a peaceful day and a sign of the better days ahead.  The Ocean is a friend of mine and helps me find myself, ground myself, be myself, refresh and remind myself that everything is a circle...

Chill Out to the sights and music of The Ocean

 I have always lived a short distance from the beach here in Florida as well as on Long Island, New York.  As I have shared with you numerous times, the beach is very much the soul of me as well as my decor.  It has been running through my veins for my whole life.  So far most of my decorating has been inside...I finally got to the front.
Gramma and I at Jones Beach, NY.


I can't thank ACE Hardware in Titusville, FL enough!  I asked, they listened!!  I can only handle a few bags at a time so they made it so much easier for me.  It works out for me physically and financially.

I have more plans for more coquina shells too, but this is it for this month.  In the meantime, there are little things to add and tweak around the front and another bed to get ready for shells. 

Meanwhile:

While my Heron was drying in the kitchen for a second time around,  more to be on the safe side, I gave his eyes a little make-up.


Then I packed some things up in my basket and went outside, planning on some outside crafting for a change.


I went out front and grabbed my sandcastle and gave it a quick coat of the sand paint...
remember this?


It may need a little bit more.
My faux coral really needed some love!  I was going to spray it red but it was originally a coral color so I stuck to that, and I had coral spray paint.


 It did have a shiny black base that I hit too with the sand textured paint.  I may hit it again and may or may not glue shells to the top around the coral.


I went inside for something, I'm not even sure what anymore, and it started to thunder!  I am not a happy camper at this point.  I decide to take the dog out before it gets closer and gave the other side of the coral a good spray of paint.

Heidi barking at the thunder!
Then she mumbles like it hears her; maybe it does.


So, since I couldn't do much outside, I thought I would share some of the things I picked up and wanted to work on BUT DIDN'T!


While at ACE Hardware, I picked up 4 coleus plants and 2 others that I haven't figured out yet.  They were only 50 cents a piece and the red coleus grabbed my attention for color.   I have some empty pots to plant these in to add color around the patio.


I thought this was cute and may be a good idea.  It was $4.99 at ACE.  It is a solar light and I am thinking of hanging it from the patio over-hang.  I'm going to see how this goes, because I might want to hang a couple in the side bed.
 

And this:


I have been eye-balling this for months at ACE and finally said "to heck with it" and bought it.  It's a table top fire pit, that says: LIVE LOVE LAUGH.  They were out of fire pit gel so I am going to use this Sterno a very little at a time for the ambiance!  There is nothing like a glass of wine and a little fire to chill out and enjoy the work I've been doing!


 I picked up a pail and these sandcastle molds were at Dollar Tree for the front.  I think if I use caulking, I can some how work them together with shells...maybe near my "sandcastle".

Need to figure out what to hang out front too.


Let's see how the week-end weather goes.... maybe I will get something done....Meanwhile, enjoy your journey!
Thursday, August 16, 2012

Time to get to work again! UP-DATED!

Good Afternoon!

I truly just want to take a nap or something!

I did some running around yesterday and it took every bit of control not to stop in to the SPCA Thrift Store!  But I stopped at ACE Hardware in Titusville and purchased more shells (6 bags) to finish the front area.  I picked some other things that I will show you later.  I went to the Dollar Tree and got a pail and shovel and sandcastle molds too to add to the front.

This morning my dog knocked the chair into the table outside and my heron fell into pieces!  I was a calm unhappy person.  I'm going to try to E-6000 glue it back together!  My pelican's beak is being glued with E-6000 now; I hope it holds.

But it is so darn HOT and STILL!  So once again I was staring at the picture outside and deciding what I want to do.  After this post, I'll go in and out and try to do a little at a time.  But what I know I want to do is in this picture:


I have to add more plastic to the right and I think the right side needs more shells than the left too.  I'm thinking a message in the bottle but want to add things slowly, not to over crowd it.

Little by little, it will get done! 

UP-DATED!
 

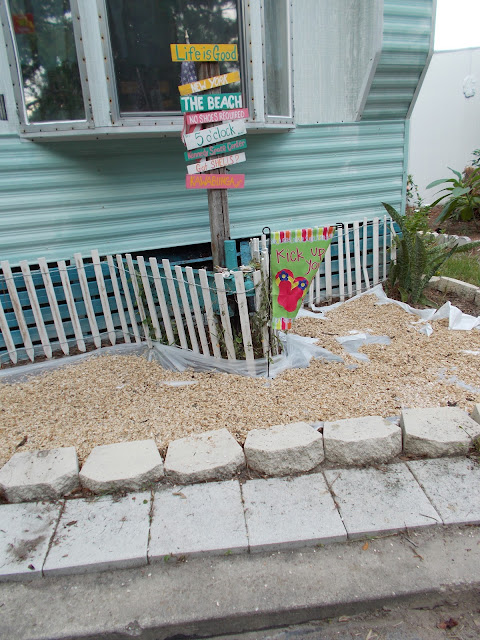
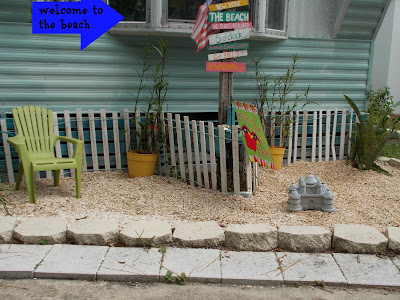
The shells are down!   I put more plastic down where it was needed and around the the snake plant.  I put all 6 bags down and I am in love with it.  I still have 1 bag of shells that I might use as a filler... we'll see how it goes.  This is what it looks like now, while we are having a serious thunder storm.

beach front, shells,

 Nothing like living in Florida and having the shells to prove it, too! 


I think it makes such a difference!


landscaping with shells

I stopped here because of a thunder storm. I want to re-paint the chair, hit the sand castle with my sand spray paint, and I have a pail and shovel to add shells to. And there's some clean up needed around the blocks...and weed killer needed.

Well, that's my journey to my beach front.  I hope you  like it too.


Monday, August 13, 2012

I love shells! I love the beach!!

I'm building my own beach!!
 

I have been posting allot about what to do with shells lately...maybe forever!  I hope you check out my Facebook page because I keep finding  more things to do with shells.  I am enjoying finding more to do with shells but especially what else can I do to make my home as beachy as possible without living on the beach.

building a beach, mobile home landscaping,

Above picture is from the fall of 2009 when I first moved in.  Sometimes I wonder if I should have left well enough alone!  But that isn't me, and so slowly but surely, I keep trying to get something done.

You don't have to live on the beach, although there is nothing like it, but love to have that beach feeling.  I am lucky enough to live in Florida where the seasons are adaptable for growing almost year 'round.  I have done pretty well without totally losing most of my plants and most came back.  But if you're not living in an area that stays warm most of the time, get what will grow and/or put plants in pots that you can bring inside for a harsh winter.  My sister has a green thumb and has such luck with beach grasses on Long Island.  They just keep on growing!


I so wish I could get my front to grow and look like that!  But I still try.

As I try to get plants to grow, there are other ways that I keep trying to bring the beach home, and you can too!  I've shown you some of these pictures before:   making my beach front

But making my beach front has been a long time coming.  It has been so hot and humid that I haven't spent much time outside at all.  I go out, basically, only when I had to and did as little as possible.  That's just reality.  When you go out and pull weeds and all you hear is your joints cracking, it isn't a good sound...then my legs got so wobbly.  It does look so nice after weeding but it takes me so darn long.  

I was so excited that ACE Hardware in Titusville started selling bags of shells but it has been slow getting the front ready.  My bags of shells are still in the back of my truck!

So, a little at a time, I've been going out to pull weeds.. try to wrap a vine that's growing around the hitch; clean up pine needles and pine cones; and trying to figure out if I should move what mulch is there and move some stone I put down.  But I have decided to worry about it when I get to that point.

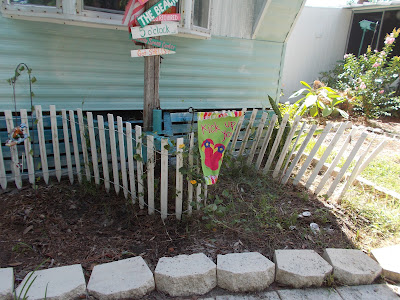
BEFORE, dune fence, landscaping,

It's getting there.... came out in the morning with the dog.  The only way I can describe her is that she was walking slow and on tippy toes towards the front.  It wound up that a woman that lives behind  me decided to pull some weeds for me!  OK by me.
I spray painted the slats at the bottom with blue... that's my water.  I started getting my 'dune fence' as close to the house and used tie wraps to secure it.  I started at the right corner and ready to attach at the back corner at the hitch.  The left above still needs to be racked out.


I just pray for breaks in the humidity to  get it done and finished soon.  I am looking forward to it being done.

what a difference!
 
Saturday, my brother-in-law participated and finished the NYC Iron Man.  After the swim and during the bike ride portion, I felt bad that he was doing all of this in New York's humidity and I was just watching.  So, being nicer than it's been, I went out to do what I could and got all the shells down except for one bag...I just couldn't lift and hold it anymore.  I'll put the other bag down tomorrow and hopefully have a better idea of how many more bags I'll need.  I really like it allot!

coquina shells, DIY, build a beach, landscpaing with sea shells, dune fence, directional pole,
 This (above) is 5 bags of the medium Conquina shells and I have one bag of small shells left in the car.  I know I need at least 6 more bags ...maybe even 10-12 more for coverage and depth.

I was going to use black trash bags as a barrier, but it was suggested it may be too dark.  I had a clear plastic role of tarp and that covered most of the front.  As you can see, for the most part I used it doubled.  I then used white trash bags to the left.


Just for your information:

Each bag is 100% nature recycled landscape shell; alternative to mulching.  No additives, no chemicals, won't float away, doesn't fade, natural source of calcium and other minerals; Only 1" of depth needed.  1/2 Cubic Foot;  6 square feet coverage area for each bag @ 1" deep.  30 pounds each bag.

Great way to beautify your:
gardens, walkways, planters and more.

There you have it, until I pick up more shells this week.  I am liking it a lot! Besides that, I am motivated to do things outside again.  

Stay tuned for the journey to my beach and have a flip flop day!! 


Friday, August 10, 2012

Tropical Island Living

Have you ever fantasized about leaving everything behind and running away with just a suitcase to a deserted island?

"sometimes a fantasy is all you need..." Billy Joel

  
Check out this article about:   Tropical Island Living

Then when you're done you just may want to create your own oasis!

ENJOY THE JOURNEY!! 


Wednesday, August 8, 2012

Easy to-do from Nate's show

I am always looking for easy inexpensive ways to change things up.  I seem to want to tackle things that are harder, which is where I get frustrated because I usually don't have the tools I need.

 I usually watch The Nate Show on a daily basis.  It comes on CBS at 3 p.m. which is usually rest time.


Easy do-over ideas:

  1. gift wrap over foam core boards cut to size for the back of bookcases, cabinets, drawers
  2. ribbon around a lamp shade; I want to get about a 2 inch wide canvas ribbon to stencil on and update my living room shades
  3. runner
  4. paint...flat for walls and ceilings (Nate's pro) 2 coats
  5. if redoing everything in a room: thrift wood furniture - easy to personalize and made to last.
  6. no sew: wrap and tuck fabric, a sweater around a pillow and use a belt, ribbon, cord, rope to 'tie the package'
  7. recover kitchen/dining room chair cushions with shower curtain; they are made to resist and clean up with damp cloth.


#1.  I didn't use foam core board on my bookcase but I like the idea and may just switch over, one of these days.  When I did this, I just laid the back on the floor, taped the maps and then nailed the back on.


#5.  I have found some great thrift finds as well as a couple of great dumpster finds.  They are made from wood and all have been sturdy enough, but wood can always be glued, nailed, reinforced, sanded and painted!
this wasn't more than $15 at SPCA Thrift; I covered it with maps of
Florida on the top, drawers and 2 sides. I wrapped the handles
with jute string.  Perfect storage in the bath room.
I had this.  It is now a stand for my printer.
I love how this turned out!
It's the drawer on printer table.
dumpster kitchen table
and thrift store chair $15


dumpster table

I had the lazy susan and painted it.
$1 at SPCA Thrift Store
It started off in the bathroom but now is
at home in the living room.


I will attempt to do this again and will follow the directions as I included in this post for you to follow:  Mistake...My attempt at decorative twine!    If you follow the directions, you can have the look of the first picture.  If one the other hand, you do what I did, you will wind up with something like the second picture!!

So there are some ideas to try, if you haven't already.  Most of all, have fun!  Have fun even when it doesn't turn out the way you expected!!

Tuesday, August 7, 2012

Making of a Mermaind sign!


I was going to do this free hand but opted to pull out the stencils instead.  Then I printed out this mermaid from The Graphics Fairy.  She's holding a cute little seal.  I hope it still looks like a seal when I'm done!

mermaid rest

The top says: Mermaid Rest.  I think this is going on my bathroom door.  I'm still trying to figure out what I am doing to the door.

Anyway, I started with a 36 inch x 3 inch hobby wood (I think it's balsam wood?) I cut it almost in half with a razor.  Glued it together with E-6000 glue.  I used the stencils and a pencil to spell out "Mermaid Rest".  I then positioned the print out on the board and used painters tape to secure it; and just traced over the mermaid pushing firmly to leave a groove in the wood.

 I then use a black permanent marker to trace over everything to be able to see it.  (This may have been a mistake.)  I used a stencil to outline the stars, hoping they will look like starfish at the end.  (we'll see.)


I wrote inside the stars.


Again, using painters tape, I taped it roughly in thirds, but did no measuring.  I sanded the glue in the center.  I used a pickled white in the middle and driftwood for the two sides.  I did the same on the back.

mermaid sign

NOTE TO SELF:  Self, the next time, bring it inside right away to dry.  Stain does not dry well in the heat and humidity! ~me

After a few hours outside and still getting stain on my fingers, I brought it in to hopefully help it dry. The black "permanent" ink seemed to run in the white stain. (that's what may have been my mistake.  Stain first, stencil and use marker after.)

 I got an idea from The Lord of the Things 's Mermaids.  He uses caulk... you have to go check his page out.  His work is unbelievable and inspiring!!  I love it. 

Anyway, I used caulk and a plastic fork to do her hair, scales on her body, the fins of the baby seal, his whiskers, and a little on his back.  Now, I have to be patient and let it all dry.

still need work on that seam.


OK Self, I think it was a BIG mistake to use E-6000 glue on this project. I think any other glue would have been a better but most probably should have used WOOD GLUE!! duh!!   

I now will be trying to scrape off as much as I can and possibly re-glue... we'll see.  Oh, it still feels like tacky glue and the stain along that line just comes off on my fingers when I touch it! darn!!


I sanded and scraped off the glue and with it came some stain but as I was working on it, I realized I probably should have stained last or had the patience to stain and let dry in a non-humid place, maybe a couple of days.  But that didn't happen so I'm working with what I have.


I used a green glitter pen to outline the seaweed above here hair; a gold glitter pen around the caulk of her hair. Then mixed a dark brown, white and yellow to pounce her hair.   I'm not sure my baby otter looks like an otter, so I may will be working on him.  After painting her body, I used another glittered aqua paint for depth and highlights, and started to use it to outline the stars and letters.


If to do it over, after tracing everything in pencil, I would have started painting.  I was anxious to see the difference between the two stains on bare wood; to get an idea of what I'd like to use on new plank floors (in the future).  I still don't know. 


I think I might also paint over the writing in the stars and work on it to be more starfish-like...and use the caulk for depth and texture.  For now, I have to let everything dry again!

I did the stars over...caulk and paint...


It's these little kind of crafts I love on hot days or days after I've pushed to much physically.  If I were to do this over, I'd do it differently  but every time I go back to work on it, I try to make it better.  But I like it and I love the sitting and creating...and it's mine!  My next sign is "Paradise Found" with palm trees for my bedroom door...if I ever finish this one!

I worked a bit on the baby seal and I think he is looking better.  I used the aqua glitter paint to add a water and wave look. I added some silver glitter to the starfish for some glistening look.


 I am going to trim with rope and give it an easy hanger... and of course add shells.  I'm just not sure about it's finishing!


 I trimmed the sign with rope, gave a quick coat on and off of the pickled white stain (I wouldn't do that again), repainted letters. glued on shells with caulk and painted the white caulk with dabs of aqua glitter paint, tied a knot with rope and the scissors is kinda holding it in place to dry.


almost done


I think I want to do some more...


What I did learn:
  • Do all the staining FIRST!
  • Then use pencil only to use tracing stencils and cut outs; don't use the marker or actually use stencil and paint;
  • Use the caulk to outline and embellish;
  • Use real star fish instead of star stencils; 
  • DON'T use stain over the paint and glitter; it takes away the vibrancy of the colors and looks kinda dull; 
  • Do better with lining up the middle (knot off centered).

Either way you do it... HAVE FUN!  It's one of a kind and made by you!!


hung on the bathroom door

Still want to do something to the door, but I don't know what yet!