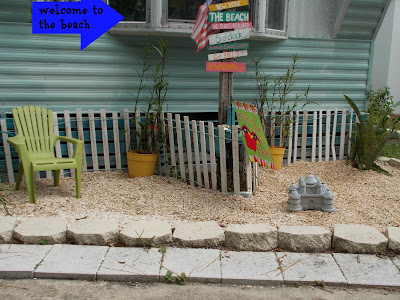
Although there are other things to do, my front is not where I want it yet. I love how beachy, clean and neat it is looking. But there is accessorizing that I want to do. I started off with spraying the sandcastle with the sand textured spray paint to get rid of that gray look.
and the coral:
 |
| before |
 | |||
| after |

This is next.
It's the little Adirondack (green) chair from the front. In my head, I'm working on a sorta sunset on the water, palm trees and birds, lettering, and sandy legs.
I kinda just went with it, with spray paints. This is my first time around with it so it was learn as you go. My inspiration came from Paintin Place's style and videos. I am so inspired by her work and love watching her.
Truthfully, I didn't think this out enough. I wanted a sunset on the back, water on the seat but that's where I got lost. I get lost on this journey often, it seems.
What I would do differently is:
decide on my primary over-all color which could have been the coral color... or blue. That would have been the legs, arms, underneath and the back side. I would have sprayed the middle of the seat yellow and I would have sprayed a good section of the back yellow and then using a paper plate, cover the "sun" and spray a half circle coral at the top and blue at the bottom, and blue up top.
Using acrylic paints, I started at the bottom, with a double loaded brush with black and brown mixed with bronze....as I got closer to the sun, I switched to double loaded brown and bronze.. It does make it difficult when you hit the opening of the slats! Stepping back and looking helps... I also find taking a picture. downloading it and looking at it in full screen helps me. That's why, if you follow by Facebook page, you saw most every step of the way.
Between the two pictures above, you can see I worked a bit on the palm trunk, worked on the palm fronds, and added a dune fence. When I was happy with it, I gave the back, bottom of tree and fence a light blast of sand paint....and decided to spray the front of the legs all the way up with the sand paint.
I couldn't leave well enough alone so I also sprayed the bottom slat that goes across from one leg to another.
This was a little disappointing! BEACHAHOLIC is read-able.... and SEASHORE ....
but it should read:
SANDY TOES & SEASHELLS BY THE SEASHORE
and as you can see, it isn't that easy to read. I am going to go over it with acrylic paint.
BUT, all and all, day one, first try, I am very happy with my chair. I can't wait for it to be DONE and sealed and outside in front on my "beach"!!
I'm done!!
I am very happy with how everything turned out and how it came together. There are things I want to move around, weeds to pull and sweeping to do BUT the storm got here before I could finish that. I am just hoping the seal on the chair holds up.
Drum Roll Please!!
Just some moving around and clean up and it's on to the next section! I am really happy with my new "beach front" property.
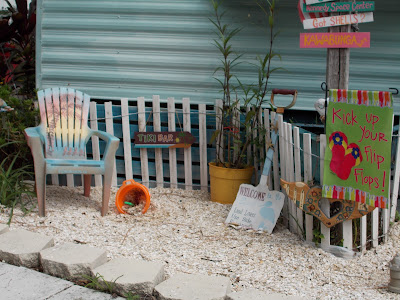
Kick up your flip-flops!
FYI: In this picture, at the top are shells I have regularly collected at the beach. The smaller ones are the coquina shells that I did the entire front with from ACE Hardware in Titusville. I just wanted to clear up any confusion as it is not sand and not a giant litter box.


It is Wonderful,,Thanks so much for shareing !!!
ReplyDeleteThank you so much Pam! You're welcome! :)
DeleteI just love this. I posted my reaction on the Homesite so won't bore you with a repeat. Just keep up the great work!!! deb in 'Bama
ReplyDeleteThank you Deb!
Deletei love this...we just sold our single wide in florida back in march...i love what you did here!
ReplyDeleteThank you so much! It has changed since and is still a work in progress adding moving shells and drift wood as I collect... but it is fun.
Delete