MY ETSY SHOP

Showing posts with label landscaping with sea shells. Show all posts

Friday, May 24, 2013

Looking back.... outside.

Sometimes I have to and sometimes it's good, to look back at where I  started and where I've gotten to so far.  Then I can see I have accomplished something and encouraged to keep on plugging away.

There was basically nothing growing but weeds and they grew very well!   The hitch that should have come off within 5 days of sitting it there, was such an eye sore...rusted and peeling.  Anything I did try to plant there either didn't grow or the man from the park that mowed, mowed or weed whacked the flowers down.

Finally the front turned into this:

You can read about it here:  My Beach Front.  More changes have been made.


Wednesday, August 22, 2012

My Beach Front


Although there are other things to do, my front is not where I want it yet.  I love how beachy, clean and neat it is looking.  But there is accessorizing that I want to do.  I started off with spraying the sandcastle with the sand textured spray paint to get rid of that gray look.


and the coral:


before


after


This is next.


It's the little Adirondack  (green) chair from the front.  In my head, I'm working on a sorta sunset on the water, palm trees and birds, lettering, and sandy legs. 

I kinda just went with it, with spray paints.  This is my first time around with it so it was learn as you go.  My inspiration came from  Paintin Place's style and videos.  I am so inspired by her work and love watching her.


Truthfully, I didn't think this out enough.   I wanted a sunset on the back, water on the seat but that's where I got lost.  I get lost on this journey often, it seems.


 What I would do differently is:

decide on my primary over-all color which could have been the coral color... or blue.  That would have been the legs, arms, underneath and the back side.  I would have sprayed the middle of the seat yellow and I would have sprayed a good section of the back yellow and
then using a paper plate, cover the "sun" and spray a half circle coral at the top and blue at the bottom, and blue up top.


Using acrylic paints, I started at the bottom, with a double loaded brush with black and brown mixed with bronze....as I got closer to the sun, I switched to double loaded brown and bronze.. It does make it difficult when you hit the opening of the slats!   Stepping back and looking helps... I also find taking a picture. downloading it and looking at it in full screen helps me.  That's why, if you follow by Facebook page, you saw most every step of the way.


Between the two pictures above, you can see I worked a bit on the palm trunk, worked on the palm fronds, and added a dune fence.  When I was happy with it, I gave the back, bottom of tree and fence a light blast of sand paint....and decided to spray the front of the legs all the way up with the sand paint.


I couldn't leave well enough alone so I also sprayed the bottom slat that goes across from one leg to another.


This was a little disappointing!  BEACHAHOLIC is read-able.... and SEASHORE ....
but it should read:
SANDY TOES & SEASHELLS BY THE SEASHORE
and as you can see, it isn't that easy to read.  I am going to go over it with acrylic paint.


BUT, all and all, day one, first try, I am very happy with my chair.  I can't wait for it to be DONE and sealed and outside in front on my "beach"!!

painted adirondack chair


I'm done!!
I am very happy with how everything turned out and how it came together.  There are things I want to move around, weeds to pull and sweeping to do BUT the storm got here before I could finish that.  I am just hoping the seal on the chair holds up.
Drum Roll Please!!


landscapng with shells

landscaping with shells


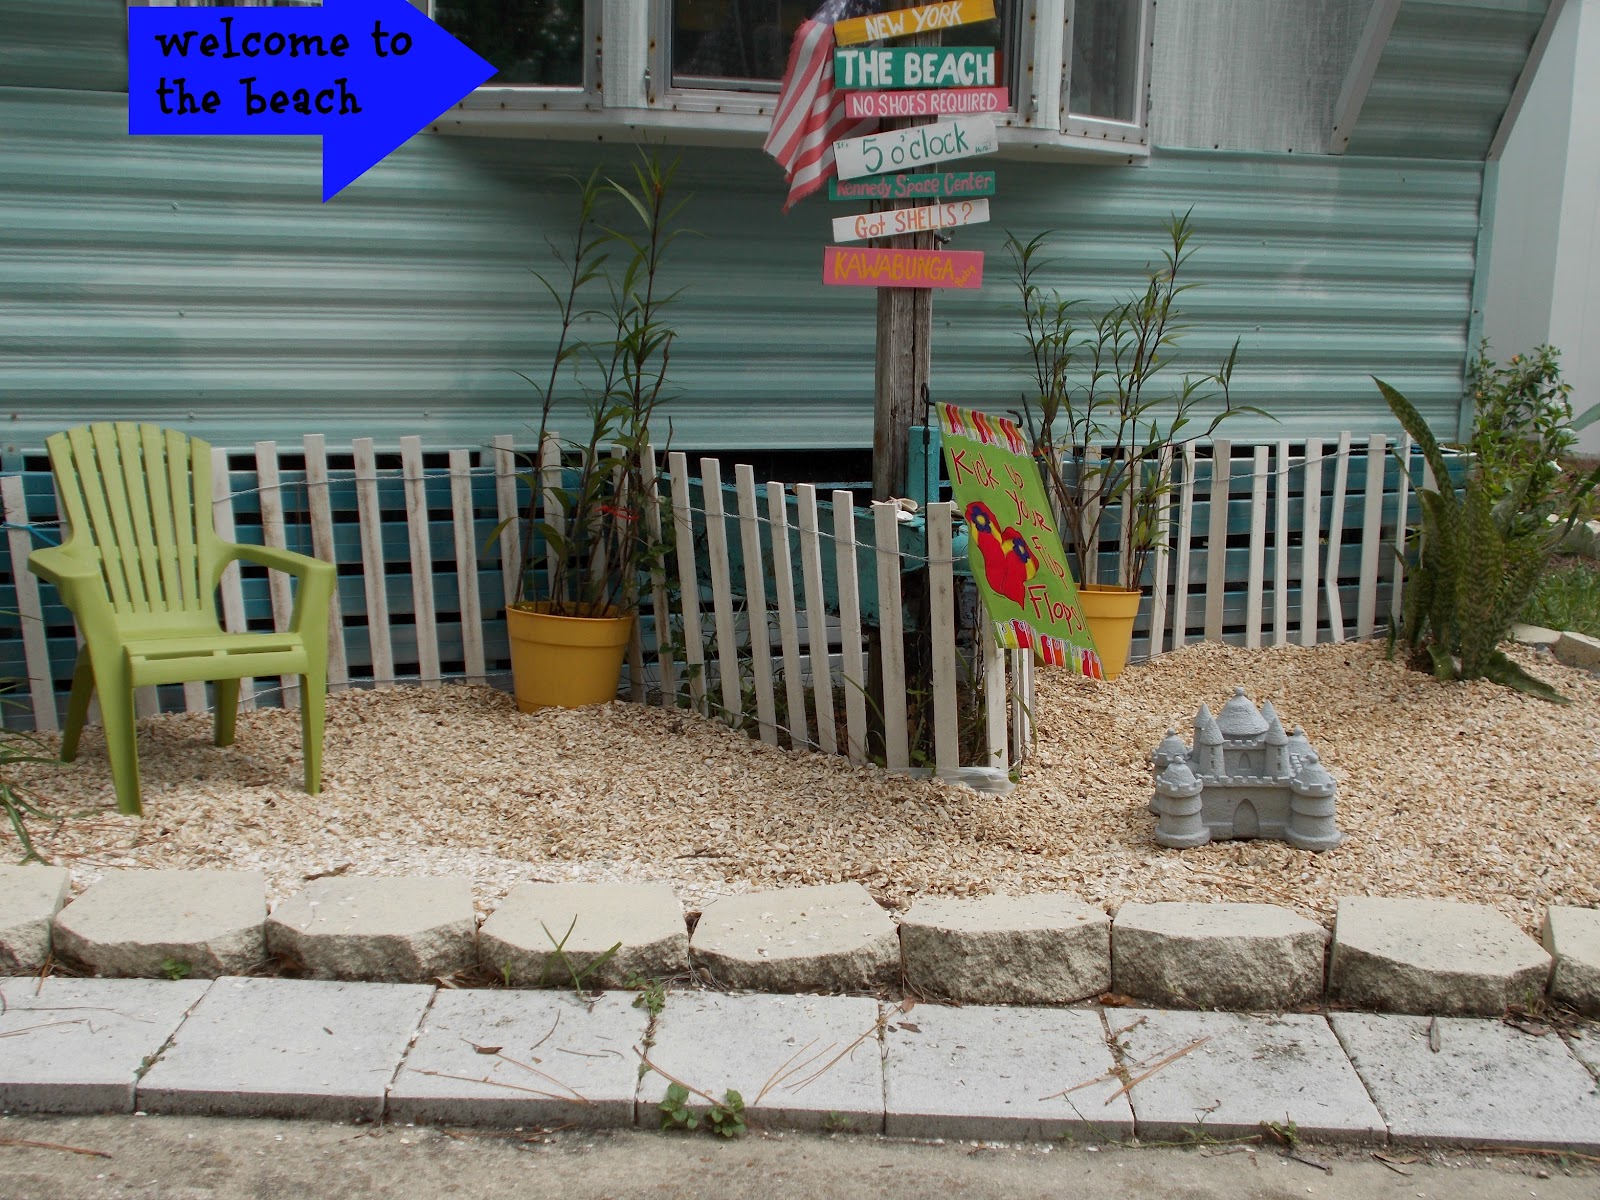
Just some moving around and clean up and it's on to the next section!  I am really happy with my new "beach front" property.


Kick up your flip-flops!

FYI:  In this picture, at the top are shells I have regularly collected at the beach.  The smaller ones are the coquina shells that I did the entire front with from ACE Hardware in Titusville.  I just wanted to clear up any confusion as it is not sand and not a giant litter box.

Saturday, August 18, 2012

A day with a change of plans...

Lanscaping with shells

I have wanted to do this forever!  and I love the way it looks!  

It's hard to live in Florida and not love the beach. But I have always loved the ocean.  I have always loved the water: the river, the bay, the sound, the gulf BUT there is nothing like the Ocean.  


Whenever I stand on the edge of "my" world and gaze out as far as I can see, I can feel so small on God's earth but so at peace.  On a nice day it is truly peaceful and calming, feeling the current tug.  Tug at your feet, tug at your soul, rejuvenating your mind, body and soul.  But on a day with a storm on the waters, the fury and anger that churns rising and falling is a magical message that "this too shall pass".  My life, just as the ocean, has ups and downs.  It has good days and not so good days.  It goes back and forth, and sometimes it's in a spin...but always, after the storm comes a peaceful day and a sign of the better days ahead.  The Ocean is a friend of mine and helps me find myself, ground myself, be myself, refresh and remind myself that everything is a circle...

Chill Out to the sights and music of The Ocean

 I have always lived a short distance from the beach here in Florida as well as on Long Island, New York.  As I have shared with you numerous times, the beach is very much the soul of me as well as my decor.  It has been running through my veins for my whole life.  So far most of my decorating has been inside...I finally got to the front.
Gramma and I at Jones Beach, NY.


I can't thank ACE Hardware in Titusville, FL enough!  I asked, they listened!!  I can only handle a few bags at a time so they made it so much easier for me.  It works out for me physically and financially.

I have more plans for more coquina shells too, but this is it for this month.  In the meantime, there are little things to add and tweak around the front and another bed to get ready for shells. 

Meanwhile:

While my Heron was drying in the kitchen for a second time around,  more to be on the safe side, I gave his eyes a little make-up.


Then I packed some things up in my basket and went outside, planning on some outside crafting for a change.


I went out front and grabbed my sandcastle and gave it a quick coat of the sand paint...
remember this?


It may need a little bit more.
My faux coral really needed some love!  I was going to spray it red but it was originally a coral color so I stuck to that, and I had coral spray paint.


 It did have a shiny black base that I hit too with the sand textured paint.  I may hit it again and may or may not glue shells to the top around the coral.


I went inside for something, I'm not even sure what anymore, and it started to thunder!  I am not a happy camper at this point.  I decide to take the dog out before it gets closer and gave the other side of the coral a good spray of paint.

Heidi barking at the thunder!
Then she mumbles like it hears her; maybe it does.


So, since I couldn't do much outside, I thought I would share some of the things I picked up and wanted to work on BUT DIDN'T!


While at ACE Hardware, I picked up 4 coleus plants and 2 others that I haven't figured out yet.  They were only 50 cents a piece and the red coleus grabbed my attention for color.   I have some empty pots to plant these in to add color around the patio.


I thought this was cute and may be a good idea.  It was $4.99 at ACE.  It is a solar light and I am thinking of hanging it from the patio over-hang.  I'm going to see how this goes, because I might want to hang a couple in the side bed.
 

And this:


I have been eye-balling this for months at ACE and finally said "to heck with it" and bought it.  It's a table top fire pit, that says: LIVE LOVE LAUGH.  They were out of fire pit gel so I am going to use this Sterno a very little at a time for the ambiance!  There is nothing like a glass of wine and a little fire to chill out and enjoy the work I've been doing!


 I picked up a pail and these sandcastle molds were at Dollar Tree for the front.  I think if I use caulking, I can some how work them together with shells...maybe near my "sandcastle".

Need to figure out what to hang out front too.


Let's see how the week-end weather goes.... maybe I will get something done....Meanwhile, enjoy your journey!

Thursday, August 16, 2012

Time to get to work again! UP-DATED!

Good Afternoon!

I truly just want to take a nap or something!

I did some running around yesterday and it took every bit of control not to stop in to the SPCA Thrift Store!  But I stopped at ACE Hardware in Titusville and purchased more shells (6 bags) to finish the front area.  I picked some other things that I will show you later.  I went to the Dollar Tree and got a pail and shovel and sandcastle molds too to add to the front.

This morning my dog knocked the chair into the table outside and my heron fell into pieces!  I was a calm unhappy person.  I'm going to try to E-6000 glue it back together!  My pelican's beak is being glued with E-6000 now; I hope it holds.

But it is so darn HOT and STILL!  So once again I was staring at the picture outside and deciding what I want to do.  After this post, I'll go in and out and try to do a little at a time.  But what I know I want to do is in this picture:


I have to add more plastic to the right and I think the right side needs more shells than the left too.  I'm thinking a message in the bottle but want to add things slowly, not to over crowd it.

Little by little, it will get done! 

UP-DATED!
 

The shells are down!   I put more plastic down where it was needed and around the the snake plant.  I put all 6 bags down and I am in love with it.  I still have 1 bag of shells that I might use as a filler... we'll see how it goes.  This is what it looks like now, while we are having a serious thunder storm.

beach front, shells,

 Nothing like living in Florida and having the shells to prove it, too! 


I think it makes such a difference!


landscaping with shells

I stopped here because of a thunder storm. I want to re-paint the chair, hit the sand castle with my sand spray paint, and I have a pail and shovel to add shells to. And there's some clean up needed around the blocks...and weed killer needed.

Well, that's my journey to my beach front.  I hope you  like it too.


Monday, August 13, 2012

I love shells! I love the beach!!

I'm building my own beach!!
 

I have been posting allot about what to do with shells lately...maybe forever!  I hope you check out my Facebook page because I keep finding  more things to do with shells.  I am enjoying finding more to do with shells but especially what else can I do to make my home as beachy as possible without living on the beach.

building a beach, mobile home landscaping,

Above picture is from the fall of 2009 when I first moved in.  Sometimes I wonder if I should have left well enough alone!  But that isn't me, and so slowly but surely, I keep trying to get something done.

You don't have to live on the beach, although there is nothing like it, but love to have that beach feeling.  I am lucky enough to live in Florida where the seasons are adaptable for growing almost year 'round.  I have done pretty well without totally losing most of my plants and most came back.  But if you're not living in an area that stays warm most of the time, get what will grow and/or put plants in pots that you can bring inside for a harsh winter.  My sister has a green thumb and has such luck with beach grasses on Long Island.  They just keep on growing!


I so wish I could get my front to grow and look like that!  But I still try.

As I try to get plants to grow, there are other ways that I keep trying to bring the beach home, and you can too!  I've shown you some of these pictures before:   making my beach front

But making my beach front has been a long time coming.  It has been so hot and humid that I haven't spent much time outside at all.  I go out, basically, only when I had to and did as little as possible.  That's just reality.  When you go out and pull weeds and all you hear is your joints cracking, it isn't a good sound...then my legs got so wobbly.  It does look so nice after weeding but it takes me so darn long.  

I was so excited that ACE Hardware in Titusville started selling bags of shells but it has been slow getting the front ready.  My bags of shells are still in the back of my truck!

So, a little at a time, I've been going out to pull weeds.. try to wrap a vine that's growing around the hitch; clean up pine needles and pine cones; and trying to figure out if I should move what mulch is there and move some stone I put down.  But I have decided to worry about it when I get to that point.

BEFORE, dune fence, landscaping,

It's getting there.... came out in the morning with the dog.  The only way I can describe her is that she was walking slow and on tippy toes towards the front.  It wound up that a woman that lives behind  me decided to pull some weeds for me!  OK by me.
I spray painted the slats at the bottom with blue... that's my water.  I started getting my 'dune fence' as close to the house and used tie wraps to secure it.  I started at the right corner and ready to attach at the back corner at the hitch.  The left above still needs to be racked out.


I just pray for breaks in the humidity to  get it done and finished soon.  I am looking forward to it being done.

what a difference!
 
Saturday, my brother-in-law participated and finished the NYC Iron Man.  After the swim and during the bike ride portion, I felt bad that he was doing all of this in New York's humidity and I was just watching.  So, being nicer than it's been, I went out to do what I could and got all the shells down except for one bag...I just couldn't lift and hold it anymore.  I'll put the other bag down tomorrow and hopefully have a better idea of how many more bags I'll need.  I really like it allot!

coquina shells, DIY, build a beach, landscpaing with sea shells, dune fence, directional pole,
 This (above) is 5 bags of the medium Conquina shells and I have one bag of small shells left in the car.  I know I need at least 6 more bags ...maybe even 10-12 more for coverage and depth.

I was going to use black trash bags as a barrier, but it was suggested it may be too dark.  I had a clear plastic role of tarp and that covered most of the front.  As you can see, for the most part I used it doubled.  I then used white trash bags to the left.


Just for your information:

Each bag is 100% nature recycled landscape shell; alternative to mulching.  No additives, no chemicals, won't float away, doesn't fade, natural source of calcium and other minerals; Only 1" of depth needed.  1/2 Cubic Foot;  6 square feet coverage area for each bag @ 1" deep.  30 pounds each bag.

Great way to beautify your:
gardens, walkways, planters and more.

There you have it, until I pick up more shells this week.  I am liking it a lot! Besides that, I am motivated to do things outside again.  

Stay tuned for the journey to my beach and have a flip flop day!!